Install Linux microPlatform
The Linux microPlatform has a base system, which is built using OpenEmbedded / Yocto. Applications targeting the Linux microPlatform are then developed and deployed as one or more containers which run on the base system. Currently, Docker containers are supported.
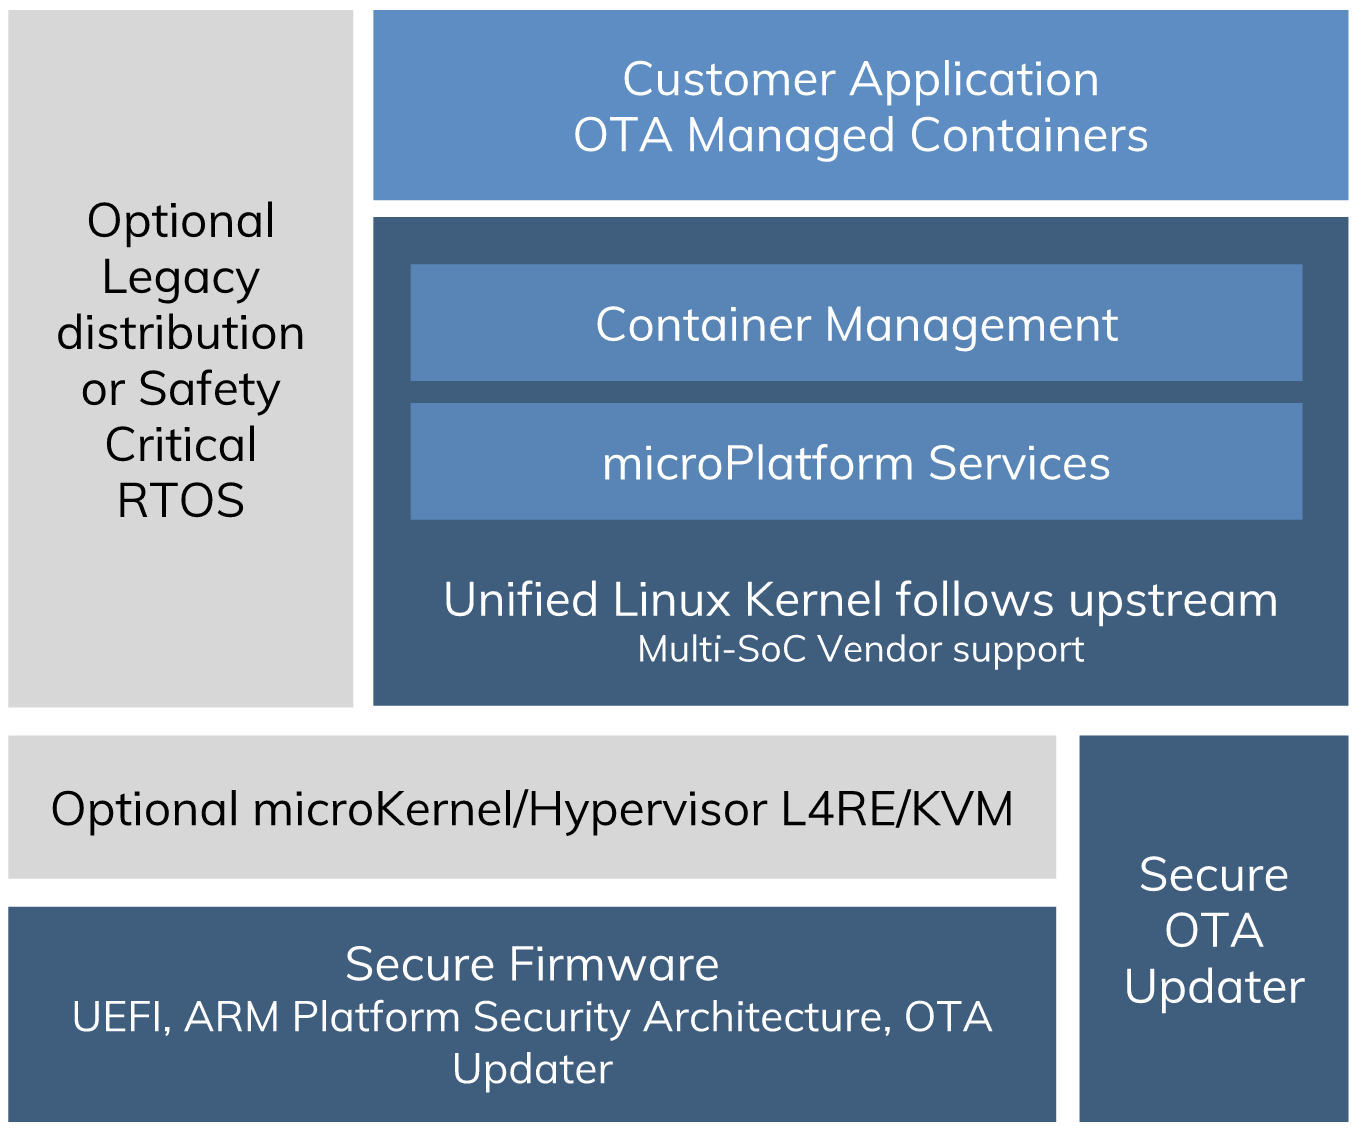
Linux microPlatform
This document describes how to:
- Install the base system onto your device.
- Run a containerized nginx web server application onto the device, to demonstrate application deployment.
Make sure you’ve set up dependencies as described in Procure Dependencies before continuing.
Later on, you’ll replace the simple nginx container with several different containers to turn your Linux microPlatform device into an LWM2M gateway for your IoT devices.
Get Prebuilt images
Subscribers: prebuilt images for Linux microPlatform update git-osf-0.7-6-g28d7082 are available for subscribers either uncompressed, or as an .xz compressed archive:
Public: publicly available images will be provided at a later date.
After downloading the image, you must rename it so it has an
.sdcard (or .sdcard.img) extension, instead of .sdimg (or
.sdimg.xz). This is necessary for Etcher to recognize it. A future
update to the binary artifacts will eliminate this step.
Flash Images To SD Card
The Raspberry Pi foundation recommends using the the cross-platform Etcher tool to flash images onto the SD card you’ll use to boot your Raspberry Pi 3.
After you’ve installed Etcher on your system:
- Attach an SD card onto your host computer. Refer to this Embedded Linux wiki guide for a list of SD cards compatible with Raspberry Pi 3.
- Run Etcher, and select the pre-built Linux microPlatform image you downloaded on your file system.
- Select the SD card you mounted from Etcher, and flash it.
Additional, more advanced guides are available for macOS, Windows, and Linux.
Boot Raspberry Pi 3 and Connect it to the Network
Connect using Ethernet
Ethernet works out of the box if a DHCP server is available on the local network.
- Connect an Ethernet cable to the Raspberry Pi 3.
- Safely unmount the SD card from your computer, and insert it into the Raspberry Pi 3.
- Apply power to the Raspberry Pi 3.
Your board will connect to the network via Ethernet. You can now log in using Zeroconf as described below in Connecting to the Board via Zeroconf.
Connect using WiFi
You can connect to a WiFi network by temporarily enabling the UART console on your Raspberry Pi 3 and running a command to connect to your WiFi network. You’ll need a 3.3 volt USB to TTL serial adapter, such as this SparkFun FTDI Basic Breakout 3.3V.
(For size reasons, the base Linux microPlatform doesn’t have windowing support enabled, so you can’t set up the initial WiFi connection using a graphical interface.)
Warning
The serial console is disabled by default on the Raspberry Pi 3. Unfortunately, using the console requires the device to run at significantly reduced speeds, and causes serious Bluetooth instability.
Make sure to follow the steps to disable the console and reboot after connecting to the network.
Mount the micro SD card containing the SD image you flashed on your workstation PC.
Edit the
config.txtfile on the VFAT partition, adding a new line with the following content:enable_uart=1
Safely unmount the micro SD card, remove it from your workstation, and insert it into the Raspberry Pi 3.
Connect the adapter to your Raspberry Pi 3’s UART and to your workstation computer via USB, e.g. by following this AdaFruit guide.
Connect a serial console program on your workstation to the adapter, and power on the Raspberry Pi 3.
When prompted, log in via the console. The default username is
osf, and the default password isosf. You should change the password before connecting to the network.Connect to the network using the following command:
sudo nmcli device wifi connect NETWORK_SSID password NETWORK_PASSWORD
Where
NETWORK_SSIDis your WiFi network’s SSID, andNETWORK_PASSWORDis the password.Safely shut down the Raspberry Pi 3, re-mount the SD card on your host workstation, and delete the line you added to
config.txt.Unmount the SD card from your workstation, insert it into the Raspberry Pi 3, and reboot it.
Your board will connect to the network you’ve saved after booting. You can now log in using Zeroconf as described in the next section.
Connecting to the Board via Zeroconf
If, as is likely, your local network supports Zeroconf, you can
log in via SSH using raspberrypi3-64.local as the hostname:
ssh osf@raspberrypi3-64.local
The board should be ready to connect within a minute or two of booting.
Remember to change the password from the default osf if you
haven’t already.
Zeroconf is a set of technologies that allows automatic discovery of
systems and services available on a local area network. It helps by
assigning a local address name (e.g. raspberrypi3-64.local instead of
192.168.1.10), which can be used by other Zeroconf compatible
services like Bonjour on macOS.
Avahi, a free Zeroconf implementation, is available by default on the Linux microPlatform, making it easy for other Zeroconf-compatible hosts to locate the IP address assigned to the board.
To use Zeroconf, simply use raspberrypi3-64.local in place of the
board’s IP address when that is needed.
Deploy nginx Container
You’ll now finish your Linux microPlatform installation by deploying an example containerized application which provides an nginx web server. Run the command on your device.
Subscribers
First, log in to the Linux microPlatform container registry on your Raspberry Pi 3:
docker login hub.foundries.io --username=unused
The username is currently ignored when logging in, but a value must be provided. When prompted for the password, enter your subscriber token.
Then run the nginx container:
docker run --name nginx-demo -p 80:80 hub.foundries.io/nginx:latest
Public
docker run –name nginx-demo -p 80:80 opensourcefoundries/nginx:latest
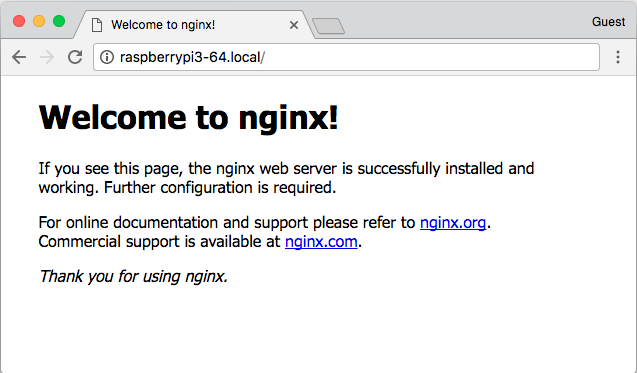
Connect to nginx
After the image is complete, the running container will stay connected to your terminal.
You can now check that it’s working by connecting to
http://raspberrypi3-64.local in your browser. You should see an nginx
splash page load, as well as log messages appearing in the terminal
where you typed docker run, like so:
nginx splash page
Example terminal output:
10.0.0.111 - - [09/Jan/2018:21:07:21 +0000] "GET / HTTP/1.1" 200 612 "-" "Mozilla/5.0 (X11; Linux x86_64) AppleWebKit/537.36 (KHTML, like Gecko) Chrome/63.0.3239.132 Safari/537.36" "-"
2018/01/09 21:07:22 [error] 7#7: *1 open() "/usr/share/nginx/html/favicon.ico" failed (2: No such file or directory), client: 10.0.0.111, server: localhost, request: "GET /favicon.ico HTTP/1.1", host: "raspberrypi3-64.local", referrer: "http://raspberrypi3-64.local/"
10.0.0.111 - - [09/Jan/2018:21:07:22 +0000] "GET /favicon.ico HTTP/1.1" 404 571 "http://raspberrypi3-64.local/" "Mozilla/5.0 (X11; Linux x86_64) AppleWebKit/537.36 (KHTML, like Gecko) Chrome/63.0.3239.132 Safari/537.36" "-"
Press Control-C to stop the container. You can now remove it using:
docker rm nginx-demo
The Linux microPlatform is now successfully deployed on your device. Move on to the next page to install the Zephyr microPlatform.
Reporting Issues
Please report any issues to the Open Source Foundries FreshDesk.